
Cleaning condenser coils regularly can improve cooling efficiency by up to 30% and help the system last longer.
Dirty condenser coils make air conditioners work harder and use more energy to cool homes. When dust, dirt, and debris build up on these coils, the system cannot release heat properly. This leads to higher electric bills and can cause the AC unit to break down sooner.
Most homeowners can clean their outdoor condenser coils with simple tools like a garden hose and coil cleaner. The process involves turning off the power, removing debris, and carefully rinsing the coils.
Professional cleaning may be needed for heavily soiled coils or indoor units. Knowing when to clean coils yourself and when to call for help can save money and prevent damage to expensive equipment.
In this article, you’ll learn how to optimize cleaning condenser coils for better AC performance, what to clean, when to clean it, and the safest DIY vs. pro methods.
Here’s what you need to know:
- Why clean condenser coils make such a difference
- What's involved in condenser coil cleaning
- How long to wait before turning the AC back on
- Costs and the value of a proper coil cleaning
- Picking the right help when you need it
Keep reading! Understanding the right cleaning methods and timing helps protect this important part of the cooling system.
Why clean condenser coils make such a difference
Dirty condenser coils force air conditioning systems to work harder and use more energy while delivering less cooling power. Clean coils help systems run efficiently, keep energy bills low, and prevent costly repairs.
What dirty coils do to cooling speed and energy use
According to ENERGY STAR, dirty evaporator and condenser coils reduce your AC’s ability to cool, make the system run longer, increase energy costs, and shorten equipment life.
Dirty condenser coils block heat transfer and make cooling systems struggle. When dirt, dust, and debris coat the coils, they create a barrier that traps heat inside the system.
The trapped heat forces the compressor to work harder. This extra work means the system uses more electricity to produce the same amount of cooling.
Energy usage increases by 10-40% when coils get dirty. The system runs longer cycles to reach the desired temperature.
Cooling speed drops significantly with dirty coils. Homes take longer to cool down, especially on hot days when the system faces the most stress.
The blocked airflow also creates hot spots in the system. These hot areas can damage expensive parts like the compressor and condenser fan motor.
Signs your condenser coils need attention
Several clear warning signs show when condenser coils need cleaning. Higher electric bills often appear first, even when usage habits stay the same.
The system runs constantly without reaching the set temperature. Rooms feel warm or humid despite the air conditioner running all day.
Visual inspection reveals the most obvious signs:
- Thick dirt or debris coating the coil fins
- Bent or damaged coil fins
- Plant growth or leaves stuck in the unit
- Ice formation on the coils during operation
Strange noises from the outdoor unit indicate problems. The system may make grinding, squealing, or rattling sounds when coils block proper airflow.
Frequent system shutdowns or error codes also signal dirty coils. The system protects itself by shutting down when internal temperatures get too high.
How clean coils cut bills and reduce wear on parts
Clean condenser coils directly reduce monthly energy costs. Systems with clean coils use 15-30% less electricity than those with dirty coils.
Lower energy consumption means smaller utility bills. A typical home can save $200-500 per year just by keeping coils clean.
Clean coils reduce wear on expensive system parts. The compressor operates at normal pressure levels instead of working overtime to push heat through blocked coils.
Component lifespan increases when coils stay clean:
- Compressors last 2-3 years longer
- Fan motors experience less strain
- Refrigerant pressures stay within normal ranges
Clean coils maintain consistent temperatures throughout the home. Each room reaches the desired temperature quickly without hot or cold spots.
The system cycles on and off normally with clean coils. This proper cycling prevents the constant running that wears out motors and electrical components.
Regular coil cleaning prevents major breakdowns during peak summer months when repair costs are highest.
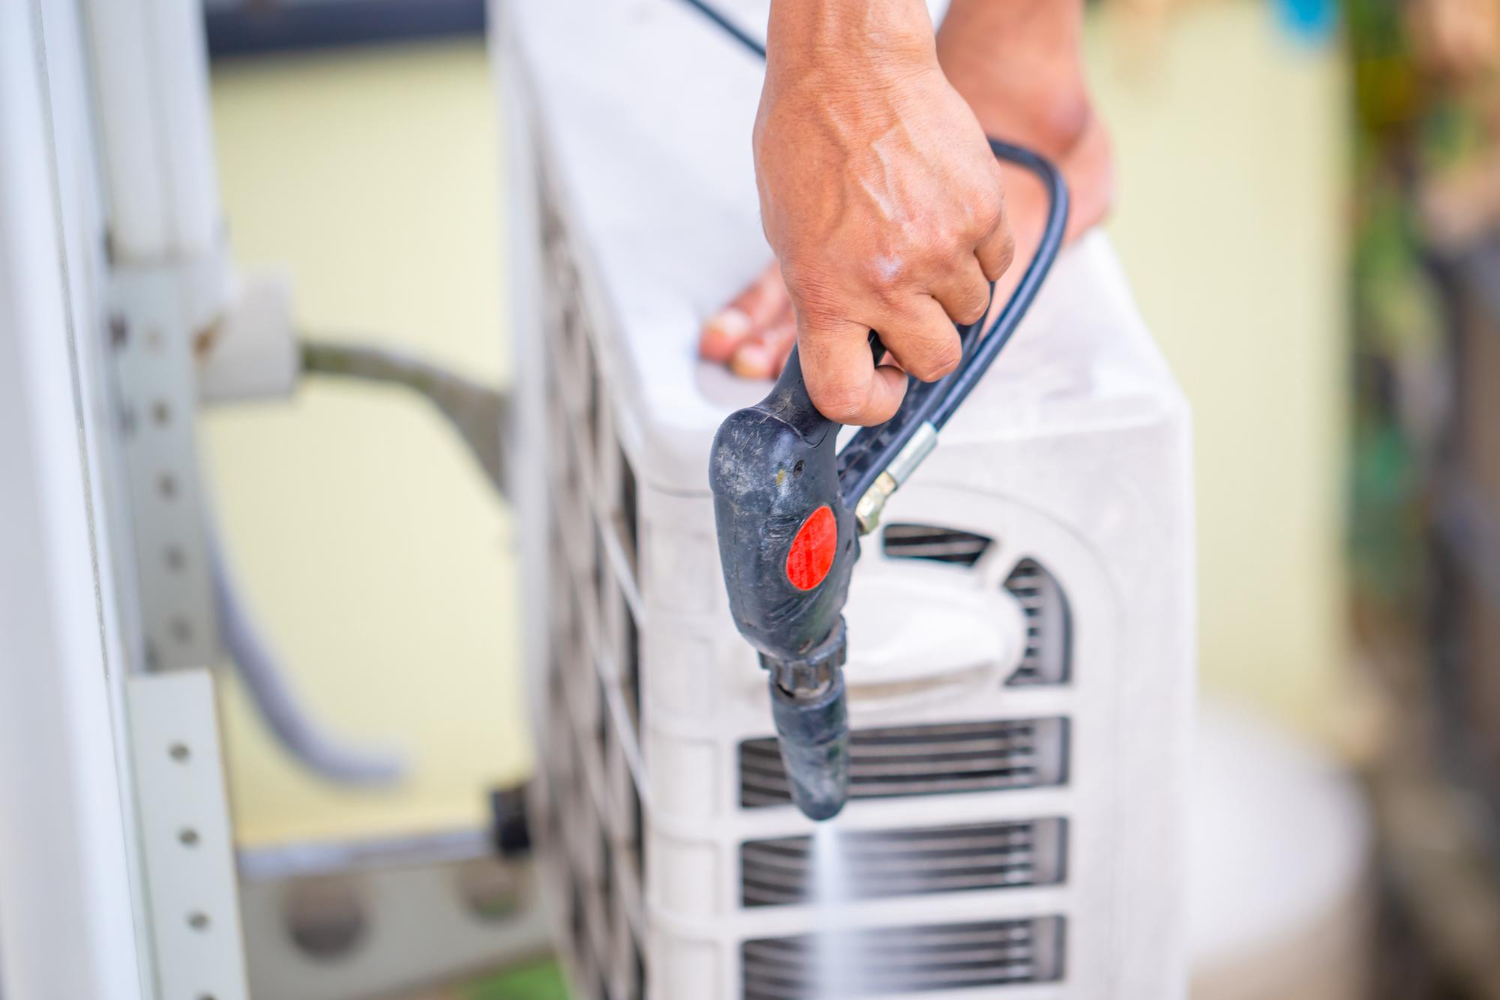
What's involved in condenser coil cleaning
Cleaning condenser coils requires proper preparation, the right cleaning products, and knowledge of when to call professionals. Different AC systems need specific approaches to avoid damage while ensuring thorough cleaning.
DIY or pro service: where to draw the line
Most homeowners can handle basic condenser coil cleaning for standard outdoor units. Simple tasks include removing debris and spraying coils with water or mild cleaners.
Professional service becomes necessary for complex situations. Rooftop units require special equipment and safety measures. Commercial systems need specialized knowledge of refrigerant lines and electrical components.
Call professionals for:
- Units requiring electrical disconnection beyond the main shutoff
- Heavily damaged or bent fins
- Refrigerant leaks or unusual noises
- Units under warranty that specify professional maintenance
DIY cleaning works best for accessible ground-level units. The process stays simple when coils show light dirt buildup rather than heavy contamination.
Choosing an air cond coil cleaner that won't damage fins
Standard coil cleaners come in foam and spray forms. Foam cleaners work well for heavy buildup because they cling longer to surfaces. Spray cleaners suit routine maintenance on lightly soiled coils.
Safe cleaning options include:
- Mild dish soap mixed with water
- Commercial coil cleaners designed for aluminum fins
- Low-pressure water alone for light cleaning
Avoid harsh chemicals like bleach or strong acids. These products corrode aluminum fins and copper tubing. High-pressure washers can bend delicate fins permanently.
Read product labels carefully. Some ac condenser cleaner products work only on specific coil materials. Test any new cleaner on a small area first.
Safe prep before you start: power off, access, drainage
Turn off power at both the unit switch and circuit breaker. Wait 30 minutes for capacitors to discharge completely. Remove the outer panels or grille to access coils fully.
Clear the area around the unit. Remove leaves, grass clippings, and other debris from the base. This prevents material from washing back onto clean coils.
Essential prep steps:
- Shut off power completely
- Remove access panels
- Clear debris around unit
- Check drainage path is open
According to the U.S. Department of Energy, you should keep the area around the outdoor condenser clear and trim foliage back at least two feet to ensure adequate airflow.
Ensure water can drain away from the unit. Blocked drainage causes water damage and reduces cleaning effectiveness. Cover nearby electrical components with plastic bags.
Aircon condenser cleaning for mini-splits vs central ac
Central AC units typically have outdoor condensers at ground level. These units allow easy access for cleaning from multiple angles. The coils wrap around the compressor in most designs.
Mini-split outdoor units mount on walls or brackets. Access becomes more challenging due to height and positioning. Many mini-splits have protective covers that require removal.
Central AC cleaning approach:
- Access from all four sides
- Remove top grille for downward cleaning
- Focus on airflow direction through coils
Mini-split cleaning differences:
- May need ladder for wall-mounted units
- Limited access angles
- Smaller coil surface area
- Different drainage patterns
Both systems benefit from regular aircon condenser cleaning. Mini-splits often need more frequent attention because their elevated position collects airborne particles differently than ground-level units.
How long to wait before turning the AC back on
Proper drying time prevents electrical damage and ensures safe operation after coil cleaning. Most systems need 1-3 hours of drying time, but specific checks help determine when it's actually safe to restart.
Dry time checks so you don't risk icing or shorts
The coils must be completely dry before turning the power back on. Wet coils can cause electrical shorts or ice formation that damages the system.
Visual inspection is the first step. The coils should show no water droplets or wet spots. Metal surfaces should appear completely dry with no moisture visible.
Touch test for moisture:
- Gently touch accessible coil areas
- Feel for any dampness or cool spots
- Check drain pan for standing water
Humidity affects drying time significantly. High humidity areas need 2-3 hours of drying time. Low humidity conditions may only require 1-2 hours.
Air circulation speeds up the process. Opening access panels and using fans helps moisture evaporate faster. Never rush this step to avoid costly repairs.
Quick airflow and temperature tests after cleaning
Start the system and monitor it closely for the first 30 minutes. Temperature and airflow changes indicate potential problems from the cleaning process.
Check the thermostat reading within 10 minutes of startup. The system should begin cooling normally. Warm air blowing after 15-20 minutes suggests moisture or cleaning product residue.
Airflow inspection points:
- Vents should have strong, consistent flow
- No unusual sounds from the unit
- Even cooling throughout the space
Feel the supply vents for cold air production. Normal systems reach target temperatures within 20-30 minutes. Longer cooling times may indicate incomplete drying.
Monitor the outdoor unit for proper operation. The fan should run smoothly without grinding or clicking sounds that weren't present before cleaning.
When a second rinse or dry pass is worth it
Cleaning product residue causes performance issues and system damage. Foam cleaners need complete removal to prevent chemical buildup on coils.
White residue or sticky surfaces indicate incomplete rinsing. Turn off the system immediately if these signs appear. A second rinse removes leftover chemicals safely.
Signs requiring additional cleaning:
- Reduced airflow after startup
- Chemical odors from vents
- Visible foam or residue on coils
- Ice formation on indoor coils
Heavy dirt buildup often requires multiple cleaning cycles. The first pass loosens debris while the second removes stubborn buildup completely.
Wait another 2-3 hours after additional rinsing. Patience during this process prevents expensive repairs and ensures optimal system performance for months ahead.
Costs and the value of a proper coil cleaning
Professional coil cleaning typically costs between $100 and $400, with most homeowners paying around $250. The investment pays off through lower energy bills and fewer repair costs over time.
According to Forbes Home, AC coil cleaning runs from about $75 to $700, with an average of $125 per coil.
What affects the price for pro service
Several factors determine how much technicians charge for coil cleaning. The condition of the coils makes the biggest difference in cost.
Heavily soiled coils require more time and stronger cleaning chemicals. This extra work can push prices toward the higher end of the range.
Location matters too. Indoor evaporator coils often cost more to clean than outdoor condenser coils because they're harder to reach.
Most companies charge $125 per coil on average. Some technicians offer package deals that include both coils for around $250 to $300.
Additional services can increase the total bill. Many pros include filter changes, basic inspections, or minor adjustments in their cleaning service.
The type of cleaning method also affects cost. Basic rinses cost less than deep chemical treatments or steam cleaning.
How coil cleaning fits into routine ac maintenance
Regular coil cleaning forms a key part of annual AC maintenance. Most HVAC companies include coil cleaning in their standard tune-up services.
Annual maintenance visits typically cost $150 to $300. These visits cover coil cleaning plus other important tasks like checking refrigerant levels and testing electrical connections.
Clean coils help the entire system work better. When coils stay clean, the AC uses less energy to cool the home.
Dirty coils force the system to work harder. This extra strain leads to higher electric bills and more wear on expensive parts like compressors.
Technicians recommend cleaning coils at least once per year. Homes with pets, dusty conditions, or heavy AC use may need cleaning twice yearly.
One-time cleanings vs seasonal tune-ups over a year
Homeowners can choose between individual coil cleanings or comprehensive maintenance plans. Each option has different costs and benefits.
One-time cleaning costs $100 to $400 depending on the coils' condition. This works for people who handle other maintenance tasks themselves.
Annual maintenance contracts typically cost $200 to $500 per year. These plans include coil cleaning plus other essential services.
Maintenance plans often provide better value. They spread costs throughout the year and catch problems early before they become expensive repairs.
Emergency cleanings during peak season cost more than scheduled maintenance. Planning ahead helps avoid premium pricing when demand is highest.
Picking the right help when you need it
Some AC coil cleaning jobs require special tools and knowledge that most homeowners don't have. Knowing when to call professionals and what questions to ask can save time and prevent damage to your system.
Questions to ask before you book coil service
Start by asking about the technician's experience with your specific AC model. Different systems need different cleaning methods and chemicals.
Ask what cleaning products they use. Good professionals use non-corrosive, foaming cleaners made just for condenser coils. They should avoid harsh chemicals that can damage the metal fins.
Find out if they inspect the whole system during cleaning. A thorough service includes checking for bent fins, refrigerant leaks, and other problems that affect performance.
Key questions to ask:
- How long have you worked on this type of AC system?
- What cleaning chemicals do you use?
- Do you check for other problems during cleaning?
- How much will the complete service cost?
- How often should I schedule this service?
Get a clear price quote before work starts. Some companies charge extra for heavily soiled coils or additional repairs they find.
When professional cleaning beats a weekend DIY
Call professionals when coils are heavily caked with dirt, grease, or other stubborn buildup. These situations need specialty chemicals and pressure washing equipment that most homeowners don't own.
Multi-row condenser coils require professional handling. Trying to separate these coils without proper tools can bend or break the delicate fins.
Systems under warranty often require professional maintenance to keep coverage valid. Check your warranty terms before attempting DIY cleaning.
Signs you need professional help:
- Coils won't come clean with basic washing
- Fins are bent or damaged
- Strange noises or smells from the unit
- AC performance hasn't improved after basic cleaning
High-end or commercial systems always need professional service. These units cost too much to risk damage from improper cleaning.
How Gary Air Solutions makes coil cleaning quick and tidy
Gary Air Solutions uses commercial-grade foam cleaners that break down dirt and grime without damaging coil surfaces. Their technicians know exactly which products work best for different types of buildup.
The team brings professional equipment including low-pressure washers and specialized brushes. This prevents damage to delicate fins while removing stubborn debris.
Each service includes a complete system inspection. Technicians check refrigerant levels, test electrical connections, and look for signs of wear that could cause future problems.
Gary Air Solutions schedules regular maintenance visits based on your system's needs. Some units need cleaning twice per year, while others only need annual service.
Their technicians clean up completely after each job. No dirty water or debris gets left behind in your yard or on your property.
Conclusion
Cleaning condenser coils is one of the most important steps in AC maintenance. Clean coils help your system work better and use less energy.
The cleaning process is simple but makes a big difference. Most homeowners can handle basic cleaning with the right tools and care.
Clean coils allow your AC to cool spaces faster. This means the system runs for shorter periods and uses less electricity.
Dirty coils force your AC to work harder. This leads to higher energy costs and more wear on parts.
The cleaning process involves turning off power, removing debris, and using coil cleaner. A soft brush helps remove stubborn dirt without damaging the fins.
Professional cleaning may be needed for heavily soiled coils. Technicians have stronger cleaners and proper equipment for deep cleaning.
Taking care of condenser coils is a simple way to keep your AC running well. This small task saves money and prevents bigger problems later.
Schedule professional condenser coil cleaning with Gary Air Solutions—book a visit for power-off inspection, fin straightening, low-pressure coil rinse, and documented ΔT/amp draw readings with an itemized quote.
